I originally published this post on Red Balloon Web. This post is very technical, but gives you an idea of how we work through sticking points to make a site lightning fast.
Speed is of the essence for websites today. Slow loading times cause fewer conversions, a higher bounce rate and more users trying another site instead. Where it was once the norm to wait for a website to load, now loading times greater than a couple of seconds are unacceptable.
Google’s Lighthouse performance audit has become the benchmark of speed and performance testing, especially since load time and mobile-friendliness are also ranking factors. The bar is high, and only 5% of websites score above 90%.
This is how I took my old homepage at www.chrisdann.com from a 41% performance score in Google Lighthouse, up to 97%, without any change in the visual appearance or functionality of the page.
Enable Text Compression – 41% to 69%
My original Lighthouse audit score was a poor 41%. Lots of work to do. (Note this is the French version of my site, but held on the same hosting and with exactly the same page layout and images as the English version. I just moved from France to the UK halfway through the process).

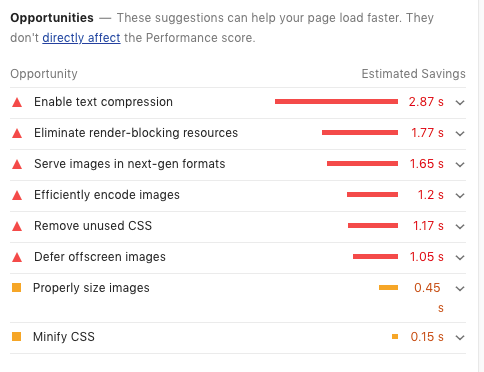
The first action Google suggested was to enable text compression. I tried to enable gzip compression via the .htaccess file but the inspector showed the files were still coming through uncompressed.
I tried using a plugin to compress the files instead (this is a custom WordPress theme written by me). It gave me the message that gzip didn’t work and to check my hoster. A bit of research at Dreamhost provided the answer.


I enabled Cloudflare on the domain, which took two tweaks to make work. Firstly Cloudflare won’t work on Dreamhost without the www prefix in the address bar, which meant changing chrisdann.com to www.chrisdann.com, remembering to update the addresses in the wp_options table.
Although non www addresses and fancy TLDs give a slick feel to our web address, I’ve moved away from both and advise my clients the same. Firstly, because myaddress.io can be confusing to less tech-savvy users, but www.myaddress.com is obviously a website to every single customer. Secondly, I’ve also had trouble with my client’s .london address when doing marketing tasks for them as over-zealous email and domain verification scripts don’t recognise it as a valid TLD, and thus won’t validate the address. Nowadays I recommend every client to go with www.mydomain.com or something similarly obvious.
The second tweak to get Cloudflare working was to change the SSL setting to ‘strict’ within the Cloudflare interface, otherwise the Let’s Encrypt SSL certificate was refused.
Now with Cloudflare enabled and providing caching, a worldwide CDN and Brotli text compression, I was already up to 69%.
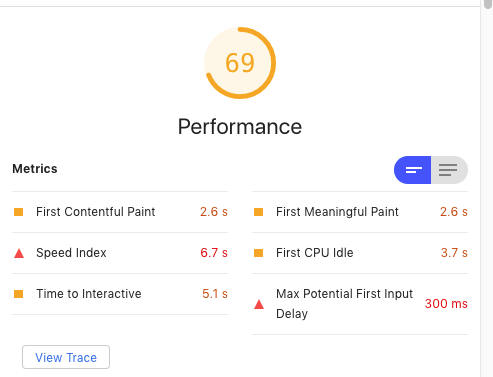
The only other caveat when using Cloudflare is to purge the cache or enter temporary “development mode” when making changes to CSS, otherwise they won’t be registered.
Efficiently Encode Images and Eliminate Render-Blocking Resources – 69% to 88%
The other suggestions to improve Google score still remained once I reached 69%.
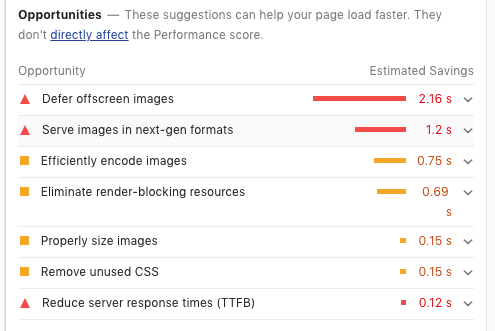
Although deferring images and serving images in next-gen formats were the biggest culprits, I decided to go for some easy wins by optimising the images, cleaning up my CSS and moving Javascript to the footer.
Minify CSS
I had always been lazy with CSS. I coded modular CSS and create 6-10 CSS files for a page, but then loaded them each individually to the page. Why not? It works just fine without compiling them together.
The problem is, of course, that each requested CSS file is another round trip between the browser and the server, adding loading time, as Lighthouse pointed out. I used Gulp to concatenate and minify my CSS files to place just one, minified, CSS file in the head of the document.
Image Optimisation
Image optimisation is as simple as playing with the JPEG export settings in Photoshop to find the greatest level of compression possible which does not cause a significant loss in visual quality, and in resizing the images so they are not any bigger than they need to be.
It’s worth remembering the image’s role within the page. One of my images was for a background which had a very dark filter over the top of it. This means the image can be a lower quality than one that will be prominently in the foreground.
Move Javascript to footer
When Javascript files are enqueued in WordPress, we have the option to place them in the header or the footer, simply by specifying this parameter in the enqueue function. I prefer to code things than to use plugins wherever possible, so all Javascript used in the document, with the exception of JQuery, was being loaded by me in the functions.php file and I had full control.
function dano_enqueue_clickhandler() {
    wp_enqueue_script( 'clickhandler', get_template_directory_uri() . '/js/dano_menu_clickhandler.js', array( 'jquery' ), '', true );
}
add_action( 'wp_enqueue_scripts', 'dano_enqueue_clickhandler');
The “true” argument at the end of the enqueue function causes WordPress to load the Javascript file in the footer rather than in the head. Without any complicated plugins, it was easy to set all arguments to true and load all JS in the footer.
JQuery is a different kettle of fish because WordPress automatically loads it in the head. After playing around a while I came across this function on Stack Exchange, which moves all JQuery to the footer. You can follow the thread if you want to find out why: https://wordpress.stackexchange.com/questions/173601/enqueue-core-jquery-in-the-footer
function wpse_173601_enqueue_scripts() {
    wp_scripts()->add_data( 'jquery', 'group', 1 );
    wp_scripts()->add_data( 'jquery-core', 'group', 1 );
    wp_scripts()->add_data( 'jquery-migrate', 'group', 1 );
}
add_action( 'wp_enqueue_scripts', 'wpse_173601_enqueue_scripts' );
Care is needed because any plugins which require JQuery will require it to be in the head, but being generally plugin-averse as I am, this wasn’t a problem. Now we were at 88%.
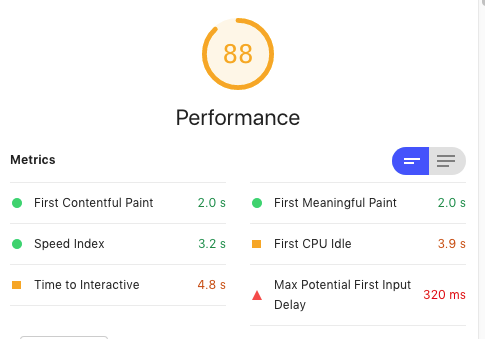
Defer Offscreen Images and Serve Images in Next-Gen Formats, remove Bootstrap and Font Awesome – 88 to 97%
Let’s look at the opportunities for improvement which still remained:

Again before looking at the images, let’s look at “Remove Unused CSS”

Bootstrap and Font Awesome are the main culprits, and there was no need for them. I was downloading the entire Twitter Bootstrap CSS and JS libraries and only really using the container classes, so I recreated them with my own CSS, replacing the few Bootstrap CSS rules I was using with my own “nostrap”. These are the container classes from Bootstrap recreated in “nostrap”.
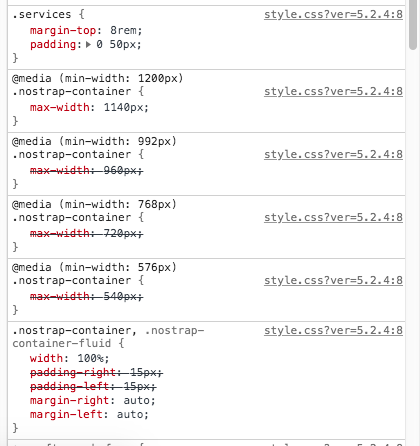
Font Awesome I was only using for the hamburger menu and the hamburger menu close button. Both are easily recreated using divs or with unicode characters. Time to move on to the images.
Using the WebP format and Lazyloading images
The WebP image format is still not universally accepted by browsers, but its use is essential if you want to increase the Lighthouse score. I began by trying two different Photoshop plugins. Neither worked. I ended up using the NPM library imagemin, which, although you don’t get to play around tweaking the compression level on individual images, is a faster solution because it will convert your entire image folder programmatically. My imagemin.js processing file took some tinkering to make work, but here it is:
const imagemin = require('imagemin');
const imageminWebp = require('imagemin-webp');

console.log ("Optimising images");

imagemin(['./8-12-19/images/*.{jpg,png}'], {
    destination: './8-12-19/imageswebp/',
    plugins: [
      imageminWebp({
        quality: 75
      })
    ]
  }).then(() => {
    console.log('Images optimized');
  });
Now we have a folder full of nice shiny WebP images, but how to make the browser display them when it supports them, and fall back onto JPEG or PNG when it doesn’t? In HTML we can use the <picture> element:
<picture>
    <source srcset="<?php echo get_stylesheet_directory_uri(); ?>/imageswebp/facebook.webp" type="image/webp">
    <source srcset="<?php echo get_stylesheet_directory_uri(); ?>/images/facebook.jpg" type="image/jpg">
    <img src="<?php echo get_stylesheet_directory_uri(); ?>/images/facebook.jpg">
</picture>
For CSS background images it’s a little more complicated as there is no equivalent to the element in CSS. The answer is the Modernizr Javascript library. Mondernizr will allow you to create a custom build to test for whichever particular browser feature you are interested in, then add classes to the tag for that feature if supported. When we include Modernizr with the test for WebP included, it will add a “webp” class to the if the browser supports WebP. Now we just add another css rule to use the WebP image if that class is present, like this:
.mydiv {
    background-image: url('my-background-image.jpg');
}

.webp .mydiv {
    background-image: url('my-background-image.webp');
}
Now the only thing left to do was to “defer offscreen images” by lazyloading. Lazyloading uses the ‘intersection observer’ JS library, which makes it child’s play to know when an element intersects with the viewport and do something with it. In our case we want to prevent the image loading until it is almost in view.
In HTML we do this by leaving the ‘src’ or ‘srcset’ of the image or picture element empty and replacing it with a ‘data’ attribute instead.
<source data-srcset="<?php echo get_stylesheet_directory_uri(); ?>/imageswebp/girl_280.webp" type="image/webp" class="lazy">
When the element comes close to view, a nifty piece of Javascript switches the src/srcset to whatever information is held in the data attribute.
lazyloadImages = document.querySelectorAll(".lazy");
    var imageObserver = new IntersectionObserver(function(entries, observer) {
        entries.forEach(function(entry) {
            if (entry.isIntersecting) {
                var image = entry.target;
						if (image.dataset.src) {
							image.src = image.dataset.src;
						}
						if (image.dataset.srcset) {
							image.srcset = image.dataset.srcset;
						}

						image.classList.remove("lazy");
						imageObserver.unobserve(image);
						}
					});
				}, options);
Again, for CSS background images we have to take a different approach, but this time it’s simple. We just add a ‘lazybackground’ class to all divs with a background-image, and then set them to have no background in the CSS.
.lazybackground { background-image: none !important; }
Instead of replacing the data attribute with the src or srcset attributes, the intersection observer simply has to remove the ‘lazybackground’ class from the div and the image will load automatically.
With these changes, I arrived at 97% for desktops and 96% for mobiles.

Postscript: Inline CSS Fail
The planned cherry on my Lighthouse cake was to inline my main CSS file, which would be one less round trip to the server.
The CSS file is a minified file produced by Gulp, so all that was needed was to copy/paste it into the header.php file. This way, however, I would have to re-copy/paste it whenever I made an edit.
Instead I decided to include it programmatically using the same method I used for my own JS files in the footer – to put everything into a PHP file and simply include that file in the PHP code.
I rewrote my gulpfile to pipe the minified CSS to style.php instead of style.css and ‘included’ the file between <style> tags in the head. Everything worked except the CSS background images.
The problem with the background images was that while you can create relative filepaths in CSS without WordPress minding, when the filepath is in the main HTML file, as the CSS now was, WordPress tries to interpret it through its own engine and draws a blank. The correct way to do it would be to include the directory path using a WordPress function as you would in the HTML itself, i.e.
background-image: url(<?php echo get_stylesheet_directory_uri(); ?>/style.css);
This is perfectly valid within the HMTL document itself and will load the file correctly, but now there’s another problem. The gulpfile won’t compile this because its not valid CSS, and throws an error when it gets to the PHP tags.

The “solution” to this problem is to remove the background-image from the CSS and put it as a data attribute in the DIV tag itself, then use javascript to switch the background-image to whatever is in the data attribute on page load.
This brings more problems than it solves, because now the images are held in the HTML while the rest of the CSS is in the CSS file. It’s also necessary to hold one data attribute for the WebP file and another for the JPEG, and to create or at least populate rules for both on page load. Nope. Everything is a trade-off between speed and functionality, and the loss in ease of coding when I come to update the page isn’t worth the extra hassle.
